Introduction: Connect Spring Boot to the IBM Db2 for i Database
This is the first part of a series of technical articles about Java and IBM i integration, called “Java and i” (yes, some pun intended). We will explore running Java applications on IBM i and leveraging the integrated IBM Db2 for i database.
Initially, we will use Spring Boot and Spring’s ecosystem. Later, we will use Java EE MicroProfile, particularly IBM WebSphere Liberty. In the meantime, we will see how to call IBM i native programs (either Cobol or RPG) from a Java application. In addition, we will also see how to call Java from an RPG program. Expect to have lots of code, commands and to roll up your sleeves.
In this first part, we will start with a simple Spring Boot application that exposes a REST API. The target of this part is to access the Db2 for i database from the developer’s IDE. This is easy enough as a starting point. As this implies, you need to have access to an IBM i machine to test the code and the sample application. Be sure that you can access the Db2 for i instance port from your PC.
On your PC, you will need:
- Java 8 JDK.
- a Java IDE (Integrated Development Environment), either JetBrains IntelliJ or Eclipse IDE (with the Maven plugin). The sample code should work on Spring Tools 4 for Eclipse, Apache NetBeans 10, and Microsoft Visual Studio Code (with the MS Java Extension pack and Spring Boot extension pack). In my case, I’m using JetBrains IntelliJ IDEA Community edition, which is open-source (Apache 2.0 license).
- IBM i Access Client Solutions desktop application.
1. Sample REST Application from Spring Guides
So, let’s get started. We will download the sample REST application from Spring Guides. This site contains a substantial list of guides and samples for learning Spring Boot and its ecosystem.
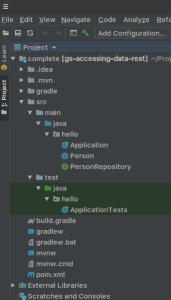
For our purpose, we will use this guide: Accessing JPA Data with REST. You can either go through the whole guide, or take a shortcut and just download the REST application or clone it with Git. Go to the gs-accessing-data-rest/complete folder and import this Maven project into your IDE. The project should look like this in IntelliJ:

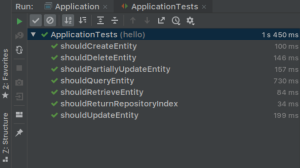
Run the ApplicationTests test class. And the results should all be green and successful.

This application uses an in-memory relational database, called H2. Next, we’re going to switch the connection to IBM Db2 for i database.
2. Apply changes in IBM Db2 for i database
2.1. Create a schema for testing purposes
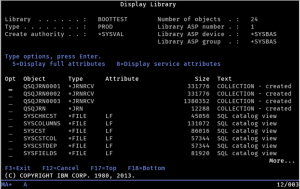
We will create a schema called BOOTTEST on Db2 for i. The easiest way I know is to use “Run SQL Scripts” on the IBM i Access Client Solutions desktop application, or maybe ask a DBA to do it. Create the BOOTTEST schema:
create schema BOOTTEST;
The BOOTTEST library is then created on the IBM i. It is also journaled and an SQL catalog is defined. The library should look like this:

2.2. Create a table in the schema
Using the same “Run SQL Scripts”, create the TPERSON table in the BOOTTEST schema:
create table BOOTTEST.TPERSON
(
  ID         int generated always as identity
                 constraint TPERSON_PK primary key,
  FIRST_NAME varchar(100),
  LAST_NAME  varchar(100)
);
3. Change the Java code in the IDE
3.1. Change the Person class
Insert the table annotation with TPERSON as table name and BOOTTEST as schema. Change the generation type of the @Id from AUTO to IDENTITY. Notice that for the TPERSON table definition, the ID column is “generated always as identity”. The Person class should begin with these lines:
package hello;

import javax.persistence.Entity;
import javax.persistence.GeneratedValue;
import javax.persistence.GenerationType;
import javax.persistence.Id;
import javax.persistence.Table;

@Entity
@Table(name = "TPERSON", schema = "BOOTTEST")
public class Person {

@Id
@GeneratedValue(strategy = GenerationType.IDENTITY)
private long id;
The remaining class stays the same.
3.2. Change Maven’s pom.xml
To use the Spring Boot latest release, we could change its version to 2.1.3.RELEASE (as of this writing):
<parent>
    <groupId>org.springframework.boot</groupId>
    <artifactId>spring-boot-starter-parent</artifactId>
    <version>2.1.3.RELEASE</version>
</parent>
Instead of using H2 in-memory database, we want to use the IBM Db2 for i database. The JDBC driver for IBM Db2 for i can be found on the JTOpen site. The latest JAR could also be found on a Maven repository.
Replace:
<dependency>
    <groupId>com.h2database</groupId>
    <artifactId>h2</artifactId>
</dependency>
By:
<dependency>
    <groupId>net.sf.jt400</groupId>
    <artifactId>jt400</artifactId>
    <version>9.7</version>
</dependency>
3.3. Add an application configuration file
The Spring Boot standard configuration file is either application.yml or application.properties. We want to put the IBM Db2 for i database location and driver class in the configuration file. I prefer using the application.yml file:
spring.datasource:
  url: jdbc:as400://[ibm_i_ip_address];naming=system;libraries=BOOTTEST;socket
timeout=30000;thread used=false;transaction isolation=read commited;translate
binary=true;date format=iso;prompt=false
  username: [db2_for_i_database_username]
  driver-class-name: com.ibm.as400.access.AS400JDBCDriver
  hikari.connection-test-query: values 1

spring.jpa:
  database-platform: org.hibernate.dialect.DB2400Dialect
  hibernate.ddl-auto: none
The whole URL value should be contained in one line. The displayed text may be displayed on several lines for formatting purposes. The URL JDBC properties (libraries, thread used, transaction isolation, etc.) are defined on the IBM Toolbox for Java JDBC properties page.
Notice that the IBM Db2 for i database password is not defined in the configuration file. This secret value has to be hidden from the source code. We will see below how we can configure the password for testing purposes.
4. Running the code
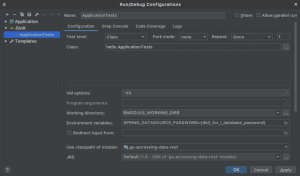
For our simple purpose, we could put the password in the user’s environment variable. As defined by Spring Boot, this variable should be called SPRING_DATASOURCE_PASSWORD. But we could also configure it in the IDE. Here is an example of this configuration in IntelliJ: Run menu > Edit Configurations… > JUnit > ApplicationTests

Now, run the ApplicationTests test class. And the results should all still be green and successful.
For part 2 of this series, we will run the same Spring Boot application on IBM i. Speak to you soon!


