

1. Introduction
This is the second part of a series of technical articles about Java and IBM i integration. We’re building on part 1, How to Connect Spring Boot to the IBM Db2 for i Database. We will be running the REST Spring Boot app on an IBM i server.
On your PC, you will need this additional tool:
- Either HTTPie (https://httpie.org/) or Postman (https://www.getpostman.com/downloads/). They both can be used to make REST requests in JSON format. I have a preference for HTTPie because it is an easy-to-use command line. For those used to wget or curl, the HTTPie usage is intuitive and natural. In addition, its syntax highlighting and JSON formatting is nice to the eye.
2. A Spring Boot app
The application from part 1 could be JAR packaged with Maven and run as is on IBM i with “java -jar” in Qshell (https://docs.spring.io/spring-boot/docs/current/reference/htmlsingle/#getting-started-introducing-spring-boot). The default Maven build produces a Java executable JAR artifact that contains an embedded Servlet server (Tomcat).
Nevertheless, a Spring Boot app is usually deployed in a home folder that is organized as shown below. Let’s take boottest app as an example in Qshell:
/home/boottest
    /config
        application.yml
    /lib
        gs-accessing-data-rest-0.1.0.jar
    /logs
        boottest.log
        boottest.log.2019-06-19.0.gz
        boottest.log.2019-06-20.0.gz
        boottest.log.2019-06-21.0.gz
    start.sh
- The config folder is where the application.yml configuration file is located: (https://docs.spring.io/spring-boot/docs/current/reference/htmlsingle/#boot-features-external-config-application-property-files)
- The lib folder contains the JAR artifact gs-accessing-data-rest-0.1.0.jar built by Maven.
- The logs folder has the application log (log) and its rolling archive.
- The start.sh script file contains the script to start the boottest application.
3. Change some config settings in the IDE
In order to have a nicer experience and production-ready features, we will add the Spring Boot Actuator and add some new application configuration settings.
3.1. Change Maven’s pom.xml
We will be adding Spring Boot Actuator as a boottest app dependency. See https://docs.spring.io/spring-boot/docs/current/reference/htmlsingle/#production-ready. This dependency should be added to the dependencies list:
<dependency>
      <groupId>org.springframework.boot</groupId>
      <artifactId>spring-boot-starter-actuator</artifactId>
</dependency>
The remaining POM file stays the same.
3.2. Change the application configuration file
Open the /src/main/resources/application.yml file. Replace its whole content with:
server:
  port: 8880
  servlet.context-path: /boottest

spring:
  datasource:
    url: jdbc:as400://[ibm_i_ip_address];naming=system;libraries=BOOTTEST;socket timeout=30000;thread used=false;transaction isolation=read committed;translate binary=true;date format=iso;prompt=false
    username: [db2_for_i_database_username]
    driver-class-name: com.ibm.as400.access.AS400JDBCDriver
    hikari.connection-test-query: values 1
  jpa:
    open-in-view: true
    database-platform: org.hibernate.dialect.DB2400Dialect
    hibernate.ddl-auto: none

management:
  endpoints:
    web.exposure.include: "*"
    jmx.exposure.include: "*"
  endpoint:
    health:
      show-details: always

logging:
  level:
    root: info
    org.springframework.web.servlet.DispatcherServlet: debug
    org.hibernate.SQL: debug
The whole data source URL value should be contained in one line. The text in our examples may be displayed on several lines for formatting purposes.
Notice that the IBM Db2 for i database password is not defined in the configuration file. This secret value has to be hidden from the source code. In part 1, we showed how to define it in the IDE. We will see how we can define it on IBM i later.
The server port value of 8880 is the boottest app HTTP port for HTTP requests and connections. Please check that the 8880 port is not already used by another service on your IBM i server.
The management endpoints configuration is for the Spring Boot Actuator.
We also added a logging configuration that will display all the incoming HTTP requests and responses. The data SQL requests will also be displayed in the log.
3.3. Running the ApplicationTests in the IDE
With the same configuration of ApplicationTests (part 1), we can run the ApplicationTests and get the same green results as part 1. The tests still run correctly.

4. Running the Application from the IDE
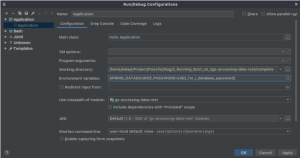
Instead of the ApplicationTests, we will run the boottest application locally, from the IDE, before running it on IBM i. In the Project pane, right-click on the Application class and choose Run ‘Application.main()’. The boottest app seems to run but it cannot connect to the database. The error is “Caused by: com.ibm.as400.access.AS400SecurityException: Password is not set.”
We have to configure the SPRING_DATASOURCE_PASSWORD environment variable for the Application in the IDE. In IntelliJ, go to: Run menu > Edit Configurations… > Application > Application and set the password as in:
When you run the Application main, you will get this in the console:
  .   ____          _            __ _ _
 /\\ / ___'_ __ _ _(_)_ __  __ _ \ \ \ \
( ( )\___ | '_ | '_| | '_ \/ _` | \ \ \ \
 \\/  ___)| |_)| | | | | || (_| |  ) ) ) )
  '  |____| .__|_| |_|_| |_\__, | / / / /
 =========|_|==============|___/=/_/_/_/
 :: Spring Boot ::        (v2.1.3.RELEASE)

2019-06-25 14:26:18.678  INFO 18502 --- [           main] hello.Application : Starting Application on mars with PID 18502

. . .


2019-06-25 14:26:24.173  INFO 18502 --- [           main] o.s.b.a.e.web.EndpointLinksResolver      : Exposing 15 endpoint(s) beneath base path '/actuator'
2019-06-25 14:26:24.249  INFO 18502 --- [           main] o.s.b.w.embedded.tomcat.TomcatWebServer  : Tomcat started on port(s): 8880 (http) with context path '/boottest'
2019-06-25 14:26:24.251  INFO 18502 --- [           main] hello.Application                        : Started Application in 5.963 seconds (JVM running for 6.313)
Now you can submit HTTP requests to the boottest app, as the Tomcat web server is ready and started. By using the HTTPie tool, we can submit HTTP requests from the command line. For example:
For command line:
http localhost:8880/boottest/people/search/findByLastName?name=Baggins
We could get:
HTTP/1.1 200
Content-Type: application/hal+json;charset=UTF-8
Date: Tue, 25 Jun 2019 18:34:05 GMT
Transfer-Encoding: chunked

{
    "_embedded": {
        "people": [
            {
                "_links": {
                    "person": {
                        "href": "http://localhost:8880/boottest/people/201"
                    },
                    "self": {
                        "href": "http://localhost:8880/boottest/people/201"
                    }
                },
                "firstName": "Bilbo Jr.",
                "lastName": "Baggins"
           }
        ]
    },
    "_links": {
        "self": {
            "href":
"http://localhost:8880/boottest/people/search/findByLastName?name=Baggins"
        }
    }
}
5. Deploy the boottest app to IBM i
The boottest app runs locally. Now we’re ready to deploy to IBM i. There are several ways to transfer files from your PC to IBM i: the Integrated File System from the IBM i Access Client Solutions, FTP (if the FTP server is up), SSH and SCP (if the SSH server is up), etc. I prefer to use a script that automates the deployment by using SSH and SCP.
Let’s create an ibm_i folder at the root of the project that contains files for the IBM i deployment. In there, we would have three files for the moment:
- application.yml
- deploy.sh
- start.sh
5.1. /ibm_i/application.yml
This application.yml contains settings that override the /src/main/resources/application.yml settings. Here’s a sample of the /ibm_i/application.yml file:
spring:
  main:
    banner-mode: "off"
  output:
    ansi:
      enabled: never

logging:
  file: logs/boottest.log
By default, the Spring Boot banner is on and the console log would have ANSI-coloured characters which are not supported on IBM i.
The logging is by default sent to the console. By specifying a file, Spring Boot will send the logging to this file. And it will automatically manage the rolling archive of the logging file.
This file will be deployed in the /home/boottest/config folder on IBM i.
5.2. /ibm_i/start.sh
This is a Qshell script that starts the Java boottest app:
cd /home/boottest && /QOpenSys/QIBM/ProdData/JavaVM/jdk80/64bit/jre/bin/java -Xquickstart -Xshareclasses:name=boottest -Xscmx128m -jar lib/gs-accessing-data-rest-0.1.0.jar
The whole command should be contained in one line. The final text may be displayed on several lines for formatting purposes.
This file will be deployed in the /home/boottest folder on IBM i.
Please make sure that you have the latest IBM JDK 8 on your IBM i server. As of this writing, here’s an example of this version in Qshell:
> /QOpenSys/QIBM/ProdData/JavaVM/jdk80/64bit/jre/bin/java -version
   java version "1.8.0_201"
   Java(TM) SE Runtime Environment (build 8.0.5.30 - pap6480sr5fp30-20190207_01(SR5 FP30))
   IBM J9 VM (build 2.9, JRE 1.8.0 OS/400 ppc64-64-Bit Compressed References 20190124_408237 (JIT enabled, AOT enabled)
   OpenJ9   - 9c77d86
   OMR      - dad8ba7
   IBM      - e2996d1)
   JCL - 20190207_01 based on Oracle jdk8u201-b09
   $
5.3. /ibm_i/deploy.sh
I’m using a Linux desktop, so this script is in BASH. If you use Windows, you have to adapt this script to a deploy.bat Windows script – unless you use the Windows Subsystem for Linux. I didn’t try this script on macOS. It should work, as macOS also uses BASH.
Here’s a sample of this script:
#!/usr/bin/env bash

mvn clean package -DskipTests

sshpass -f ~/.ssh/ibmipwd ssh [your_ibm_i_login]@[ibm_i_ip_address] "mkdir -p /home/boottest/config | chmod 777 /home/boottest/config"
sshpass -f ~/.ssh/ibmipwd ssh [your_ibm_i_login]@[ibm_i_ip_address] "mkdir -p /home/boottest/lib | chmod 777 /home/boottest/lib"
sshpass -f ~/.ssh/ibmipwd ssh [your_ibm_i_login]@[ibm_i_ip_address] "mkdir -p /home/boottest/logs | chmod 777 /home/boottest/logs"

sshpass -f ~/.ssh/ibmipwd scp [your_project_root_path]/gs-accessing-data-rest/complete/ibm_i/application.yml [your_ibm_i_login]@[ibm_i_ip_address]:/home/boottest/config
sshpass -f ~/.ssh/ibmipwd scp [your_project_root_path]/gs-accessing-data-rest/complete/ibm_i/start.sh [your_ibm_i_login]@[ibm_i_ip_address]:/home/boottest
sshpass -f ~/.ssh/ibmipwd scp [your_project_root_path]/gs-accessing-data-rest/complete/target/gs-accessing-data-rest-0.1.0.jar [your_ibm_i_login]@[ibm_i_ip_address]:/home/boottest/lib
My IBM i password is stored in the ~/.ssh/ibmipwd in clear text. Once the ibm_i/deploy.sh is executed, we will have a folder organization on IBM i that looks like the one pictured above in section 2. A Spring Boot app.
6. Running the boottest app on IBM i
Now, you can log into the IBM i server. If you use your user profile to start the boottest application, then you need to define the SPRING_DATASOURCE_PASSWORD environment variable. The best way for now is to define the variable once, in your “.profile” file (/home/[your_ibm_i_login]/.profile). This file permission should be 600 or “-rw——-” as only you can read and write this file. You have to restart the Qshell to get the variable defined.
Here’s a sample of my .profile file:
> cat .profile

   alias ll='ls -ali'
   alias ..='cd ..'

   export SPRING_DATASOURCE_PASSWORD=[db2_for_i_database_password]
   export JAVA_HOME=/QOpenSys/QIBM/ProdData/JavaVM/jdk80/32bit
We could go to the /home/boottest folder and launch the ./start.sh shell to start the boottest app. (But beware, all Unix/Windows/macOS/Linux/BSD users, once you exit the Qshell via the F3=Exit key, you kill the boottest app JVM process too!)
You can use the F12=Disconnect key to get out of the Qshell job without killing this job. But this is not sustainable as a Spring Boot app running procedure. The best way is to use the IBM i way.
6.1. Start the Spring Boot app on IBM i
To submit a batch job on IBM i, you can use the SBMJOB Submit Job command. First, however, we need to set the user profile’s session to redirect the console output to none. We already set the Spring Boot app to log on a file (boottest.log) on the IBM i. This command is:
ADDENVVAR ENVVAR(QIBM_QSH_CMD_OUTPUT) VALUE(*NONE)
Then, to start the boottest app, we need to submit this command:
SBMJOB CMD(QSH CMD('/home/boottest/start.sh')) JOB(BOOTTEST) JOBQ(QSYSNOMAX)
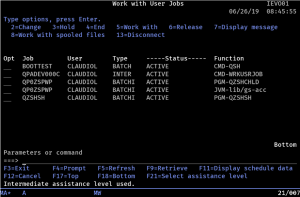
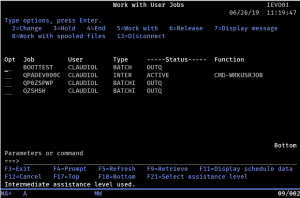
6.2. Check the execution on IBM i
The WRKACTJOB or WRKUSRJOB commands show the execution of the boottest app, as in:
WRKUSRJOB STATUS(*ACTIVE)
We can also check the logging file by using the WRKLNK command:
WRKLNK OBJ('/home/boottest/logs/boottest.log')
We can see that, at 2019-06-26 08:45:46, the boottest app was started by the SBMJOB and start.sh.
Then, after 29 seconds, the boottest app is completely started on port 8880 (context path /boottest).
6.3. Submit requests to the IBM i
Let’s submit some REST requests to the boottest app on IBM i. The first one is the same as previously done in “4. Running the Application from the IDE”, but using the IBM i IP address, which is protected by XX.XX.XX.XX:
http XX.XX.XX.XX:8880/boottest/people/search/findByLastName?name=Baggins
The result is:
HTTP/1.1 200
Content-Type: application/hal+json;charset=UTF-8
Date: Wed, 26 Jun 2019 09:30:11 GMT
Transfer-Encoding: chunked

{
    "_embedded": {
        "people": [
            {
                "_links": {
                    "person": {
                        "href": "http://XX.XX.XX.XX:8880/boottest/people/201"
                    },
                    "self": {
                        "href": "http://XX.XX.XX.XX:8880/boottest/people/201"
                    }
                },
                "firstName": "Bilbo Jr.",
                "lastName": "Baggins"
            }
        ]
    },
    "_links": {
        "self": {
            "href": "http://XX.XX.XX.XX:8880/boottest/people/search/findByLastName?name=Baggins"
        }
    }
}
Let’s create a new record:
http POST XX.XX.XX.XX:8880/boottest/people lastName=Wayne firstName=Bruce
The HTTP response is:
HTTP/1.1 201
Content-Type: application/json;charset=UTF-8
Date: Wed, 26 Jun 2019 10:28:16 GMT
Location: http://XX.XX.XX.XX:8880/boottest/people/202
Transfer-Encoding: chunked

{
    "_links": {
        "person": {
            "href": "http://XX.XX.XX.XX:8880/boottest/people/202"
        },
        "self": {
            "href": "http://XX.XX.XX.XX:8880/boottest/people/202"
        }
    },
    "firstName": "Bruce",
    "lastName": "Wayne"
}
When querying for the new record, the log file is traced. Let’s try this request:
http XX.XX.XX.XX:8880/boottest/people/search/findByLastName?name=Wayne
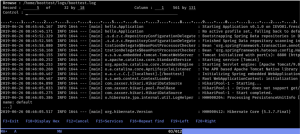
We could watch the log file using the WRKLNK command, but we can also download the boottest.log file by using the Integrated File System from the IBM i Access Client Solutions. Browse to the /home/boottest/logs folder and download the boottest.log file. It is easier to visualize the file on a PC as logs easily tend to get over 80 columns.
At the end of the log, we can see the trace of the request and the SQL that was executed to get the data.
2019-06-26 11:07:27.815 DEBUG 1699 --- [http-nio-8880-exec-10] o.s.web.servlet.DispatcherServlet        : GET "/boottest/people/search/findByLastName?name=Wayne", parameters={masked}
2019-06-26 11:07:27.825 DEBUG 1699 --- [http-nio-8880-exec-10] org.hibernate.SQL                        : select person0_.id as id1_0_, person0_.first_name as first_na2_0_, person0_.last_name as last_nam3_0_ from boottest.tperson person0_ where person0_.last_name=?
2019-06-26 11:07:27.869 DEBUG 1699 --- [http-nio-8880-exec-10] o.s.web.servlet.DispatcherServlet        : Completed 200 OK
6.4. Stop the Spring Boot app on IBM i
As we gave a name to our batch job, we could end the job just by launching the ENDJOB command:
ENDJOB JOB(BOOTTEST) OPTION(*IMMED) LOGLMT(0)
This gracefully stops the boottest app right away. The WRKUSRJOB command will give us:
The boottest app is no longer active. All REST requests to this server and to port 8880 get a connection error.
6.5. Some comments
The SPRING_DATASOURCE_PASSWORD secret was defined for the profile that launches the submit job (see above: “6. Running the boottest app on IBM i”). It would be better to define it once and only once in the BOOTTEST user profile (hidden in its .profile file). Then, run the submit job with the BOOTTEST user profile. For example:
SBMJOB CMD(QSH CMD('/home/boottest/start.sh')) JOB(BOOTTEST) USER(BOOTTEST) JOBQ(QSYSNOMAX)